I LOVE the Book of Birthdays template in this week's Digital Download release. This would make a very quick, easy, and FABULOUS gift for Mom this Mother's Day!
I LOVE the Book of Birthdays template in this week's Digital Download release. This would make a very quick, easy, and FABULOUS gift for Mom this Mother's Day!
Hi Stampers,
I'm here with this week's Create with Connie and Mary Challenge. This week we were given a sketch to inspire our creations…
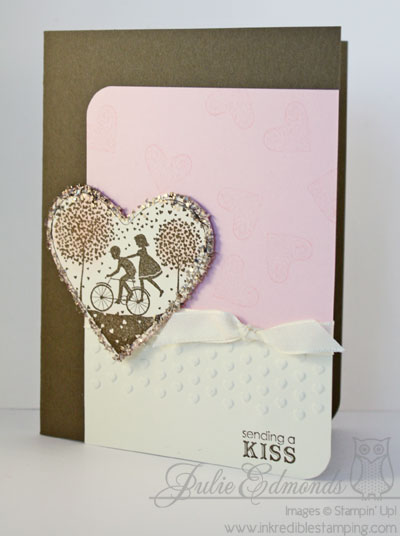
Unfortunatly we had a Sympathy card we needed to send out this week so I used the sketch for my card layout inspiration. I wanted to  keep things simple. I used a mostly monocromatic color scheme of Poppy Parade and Calypso Coral. I was a little worried at first that the card was going to be too bright for a sympathy card but I'm happy with the way the colors came out. I think they're soft enough.
I didn't seem to have my Stampin' Mojo working on this one (Maybe because it was a sympathy card?? I don't know) I just wasn't as happy with the final card as I wanted to be …. but it's still handmade and from the heart – which is ALWAYS better!! 🙂
Don't forget to visit the Create with Connie and Mary website to get more inspiration from the other designers!
I hope you're inspired to play along with us this week! We love to see what you come up with!

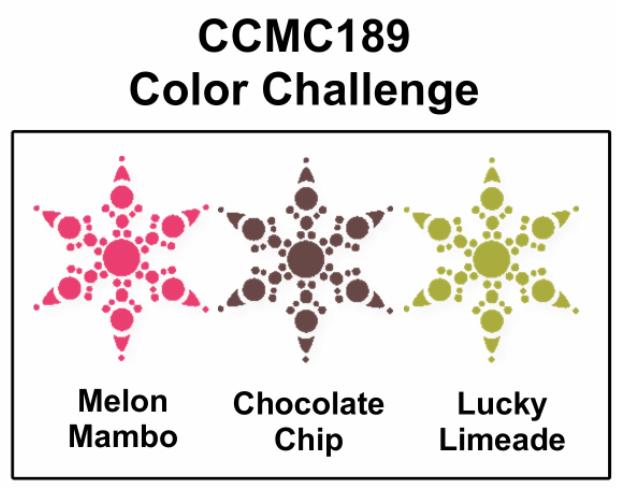
Hi Stampers,
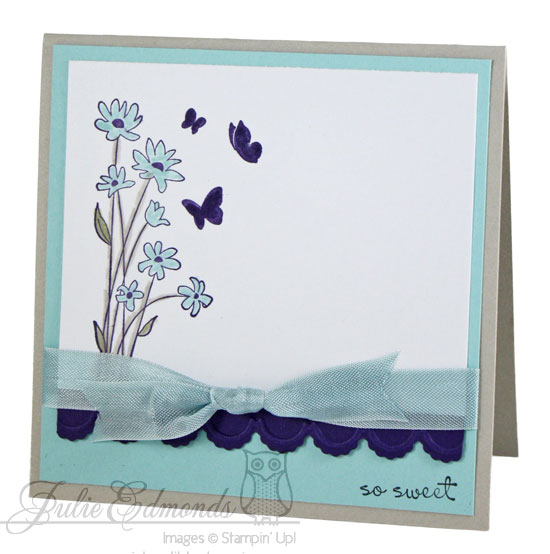
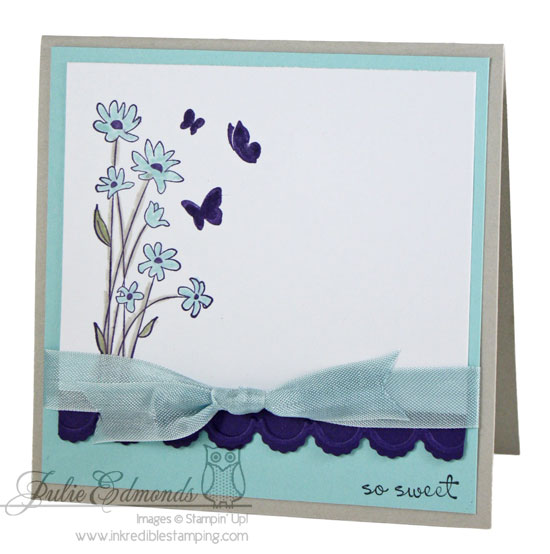
I'm here with this week's Create with Connie and Mary Challenge. This time we had a color challenge…
The Colors for this Challenge, Peach Parfait, Lucky Limeade, and Pool Party are not colors I would normally have put together for a combo. The 
combo is pretty straight forward, just not in my normal choice of colors so I had a hard time coming up with my idea for this card. But once I jumped in and started creating I LOVED the way things turned out! For pretty bold colors this card looks very soft and dreamy – which works for the Dare to Dream greeting!
Don't forget to visit the Create with Connie and Mary website to get more inspiration from the other designers!

Glitter Techniques
| Q&A
A: Got to love glitter! But using the right adhesive for the job is important so that you get the best effect for your project without having glitter everywhere! We have several great adhesive options for glitter depending on the look you want to achieve. Fast Detailed Large Areas Glass Glitter Be Dazzling |
||
| © CraftyPerson Production. Images © Stampin' Up! | ||
This weekend my Cousin was celebrating her Baby's 1st Birthday with a Rainbow Party!
Of course you know for me that means the present has to work with the theme! So I decided to create a Rainbow tag for the wrapping.

OMG I think this tag is the most adorable thing I've made EVER (If I do say so myself <grin>)
Of course the gift inside the package had to work with the theme too – So I found what I quite possibly my new FAVORITE children's book EVER: Pantone Colors
I LOVE how this board book takes a different look at colors – For each color it shows the Basic Color and 20 different shades of the color

This is the Purple page! after I got the book I kept opening it up and looking at all the pretty colors – Is it wrong that I wanted to keep this book for myself?! 🙂 The creative person in me LOVES that kids can learn the basic colors from the words and then quickly pick our favorite and least favorites in each color assortment!!
Ok back to wrapping the gift – I wanted the rainbow tag to really pop so I decided to wrap the gifts in simple White wrapping paper (a little different from me – I usually love bright and wild papers)

I tied the packages with Real Red Ribbon and attached the tag with Pool Party Bakers Twine. So bright and fun… and here's a little cuteness for you to see how well I matched 🙂 Mom and baby her in rainbow tutu

So how did I make the tag?? It's very easy! I used the Labels Collection Framelit Dies (See Them Online)
Don't forget the Outlined Occasions Stamp set is only avaliable until March 31, 2012 – it's one of the sets you can earn FREE when you purchase $50 in product during Sale-a-Bration. Find out more here.
Hi Stampers,
I'm here with this week's Create with Connie and Mary Challenge. This week we were given a sketch to inspire our creations…
This sketch was clean and simple. I added a little twist – turning the card to horizontal.  Thanks what I LOVE about sketches you can take the basic sketch and alter it so many different ways!!
I needed a card for a knitting friend – so I used my Hand Knit stamp set to create this card. I LOVE coloring my sheep in .. In my world yarn would always come off sheep in pretty rainbow colors – no dying required! 🙂
Don't forget to visit the Create with Connie and Mary website to get more inspiration from the other designers!
I hope you're inspired to play along with us this week! We love to see what you come up with!
Hello to all my Color Exprimenters out there!!
I know I've been gone for quite a while! I'm so sorry your color challenges disappeared kinda suddenly – things got a little crazy for me for a while and I had to take a break from experimenting for a while!
But I'm back now!!!!!
And with FUN news about our Challenges!! I'm not going to be hosting o ur COlor Challenges on our Facebook Page – This way we get MUCH bigger pictures of our color challenge creations! You can upload your project photos, add the link to your blog post and like your favorite expriments!!
I'm really excited about our first Color Challenge!!
Cliek Here to Find all the Details for {MCI56} ColorLab Color Challenge
Hi Stampers,
I'm here with this week's Create with Connie and Mary Challenge. This time we had a color challenge…
The other day I was playing around with my edgelit die and looking at some of the 
Did you see my Wordless Wednesday post yesterday? I had pictures of how I got this pretty shaded look on my clouds. I love the way the clouds came out. The shading is actually much subtler than it looks in this picture – I turned up the contrast a bit to help you see it.

It's a very quick and easy way to get some depth to to the clouds in your sky – try it out!!
Don't forget to visit the Create with Connie and Mary website to get more inspiration from the other designers!


