• Hi Stampers!

    I've got some exciting new to share today!


    ColorRefresh

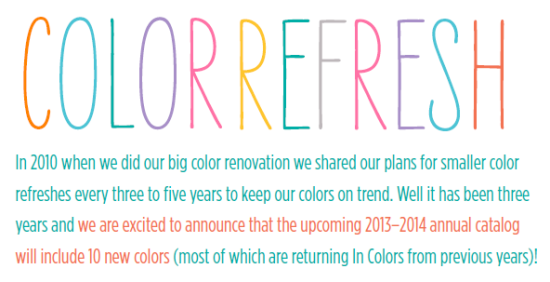
    Announcing Stampin' Up!'s Color Refresh! We love color and we know that you do too. Color is fundamental to who we are and what we offer. It's important for us to stay up-to-date with color trends so we are thrilled to share our updated line of colors, and hope you will be as excited as we are by the new possibilities!

    Why now? In 2010 we did a big color renovation and shared our plans for smaller color refreshes every three to five years to keep our colors on trend. Well it has been three years and we are excited to announce that the upcoming 2013-2014 annual catalog will include 10 new colors (most of which are returning In Colors from previous years)! We are welcoming back some of your favorites, moving some colors around, and introducing one brand-new color, so take a look!

    The upcoming 2013-2014 annual catalog will include 10 new colors (most of which are returning In Colors from previous years)!

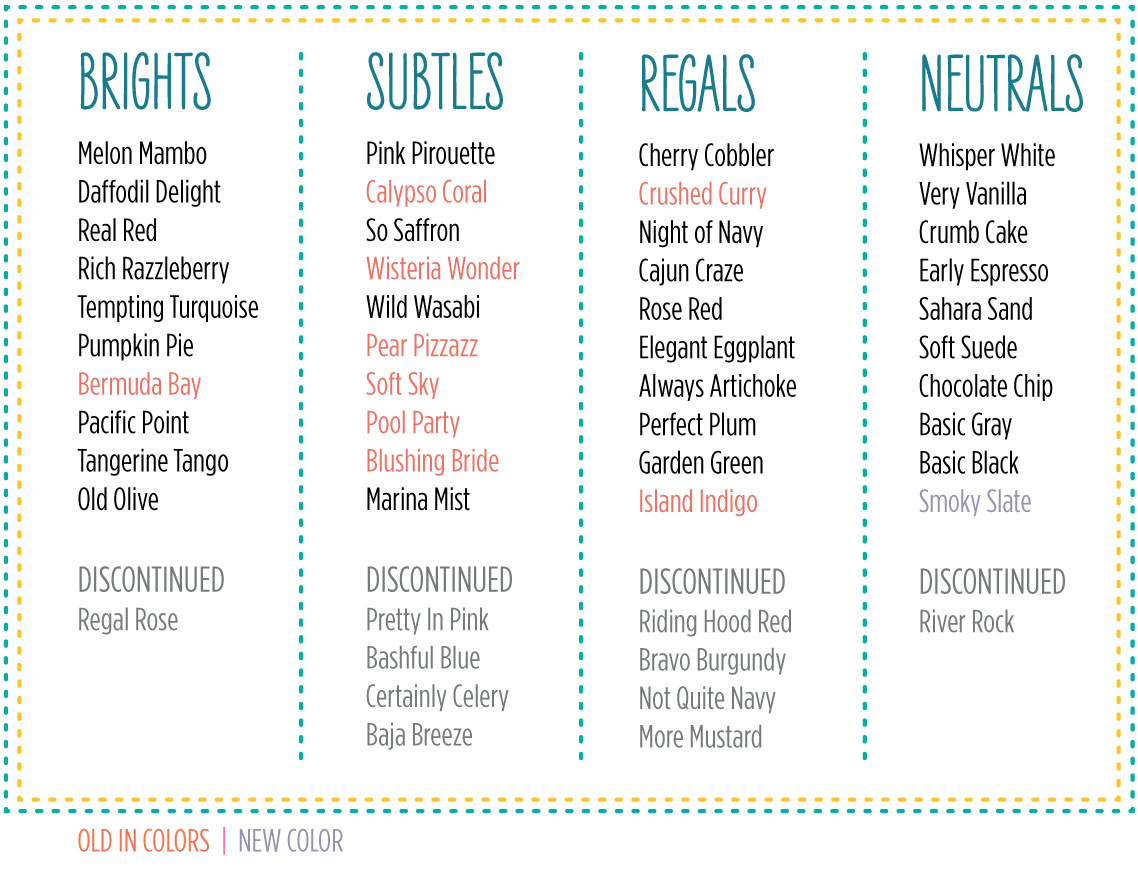
    • We'll have one TOTALLY NEW color: Smoky Slate
    • FOUR returning current In Colors: Calypso Coral, Pool Party, Island Indigo, and Wisteria Wonder
    • FIVE returning past In Colors: Bermuda Bay, Crushed Curry  Pear Pizzazz, Blushing Bride, and Soft Sky

    Check out these colors displayed in their new collections!


    Demo_landing_page_Q_and_A_C
    Print: Color Refresh Flyer

    Starting Today all retiring/discontinued color products (i.e. ink, paper, ribbon,
    accessories, etc.) will be available only while supplies last.

    Make sure to visit my Stamping Store and stock up on the supplies you need in the following colors:

    • Regal Rose
    • Pretty in Pink
    • Bashful Blue
    • Certainly Celery
    • Baja Breeze
    • Riding Hood Red
    • Bravo Burgundy
    • Not Quite Navy
    • More Mustart
    • River Rock
    • Lucky Limeade

    And it gets even better!!! Stampin' Up! is having a FREE SHIPPING event this weekend April 6-8, 2013 get free shipping on every order – big or smal. But remember retiring colors are while supplies last – so if you have a color you REALLY LOVE and want to stock up on you may not want to wait for FREE Shipping to order!!


  • Hi Stampers,

    If you've been following me over on my Facebook page I shared a picture of all the fun tablemate gifts we shared at regionals over the weekend! I have some SUPER talented team members 🙂

    Today I am sharing the gift I made for all my Create, Ink! team members who were at regionals with me. I've been wanting to play around with making a key fob – so I decided this was a GREAT time to try that out and it was SUPER easy!

    Stampin_Up_Key_Fob_1
    These are the Key Fobs I made (Keep reading for full supplies and directions). I made simple tags to coordinate with them.

    Stampin_Up_Key_Fob_2
    and then tied the tags around a cello bag to complete the gift.

    Stampin_Up_Key_Fob_3

    and here they are all dressed up and ready to be packed up for regionals.

    Stampin_Up_Key_Fob_4
    Ok so now that I'm finished with the eye candy I know you're asking how to make them. First a list of supplies complete with sources for the materials!


    • 1-1/4" Cotton Webbing (Source: Amazon) I used Aqua but there are LOTS of fabulous color choices,
    • Designer Fabric (Source: My Stampin' Up! Store) I used the Early Espresso from the Essentials Fabric. Don't forget this week only (March 25-31, 2013) all our fabric is 50% off!!!
    • 1.25" Key Fob Hardware with Split Ring (Source: Amazon)
    • Sewing Machine
    • Thread to Match your project
    • Iron
    • Medium Round Fabric YoYo Maker (Source: Amazon)
    • Stampin' Up! Button to cordinate with your fabric. (I used buttons from Sale-a-bration)
    • Needle and Thread

    Ok now here's how to make your Key Fobs.

    1. Cut an 11" length of Cotton Webbing.
    2. Cut SU Designer Fabric 2" x 11"
    3. Lay your fabric on the Ironing Board wrong side up. Along the long edge, fold each side into the center (so they meet) and iron well to make nice creases. Flip it over. When you're finished you'll have a 1" x 11" piece of fabric with clean edges and the seam on the back.
    4. Center the Fabric onto the Cotton Webbing. (You may want to use pins to keep the fabric in place while you're sewing but we just held it in place.)
    5. Sew Straight down one edge of the fabric, sewing it onto the Cotton Webbing. Now sew straight down the other side.
    6. Fold the Cotton Webbing in half (with the fabric on the outside) Here's the only tricky part. Sew across the ends of the cotton webbing a few times attaching both layers of cotton webbing and fabric together. Just go slow and take your time – it's a lot of thickness to sew through
    7. Center your Cotton Webbing in the Key Fob Hardware and gently use pliers to crimp the hardware closed. You may want to put tape around the ends of your pliers so you don't scratch the hardware. Be careful not to use too much pressure or you'll dent the hardware.
    8. Cut a scrap of fabric and follow the directions included wih the Yo-yo maker to create a fabric Yo-yo out of matching or coordinating fabric.
    9. Sew a button onto the center of the Yo-yo and then use the needle and thread to attach the Yo-yo to the key fob near the hardward end.

    That's is! Add your keys and you're ready to go!!!


    Related articles

    It's a Fabric Frenzy!!
    Ears to You Friend…
    Thanks a Million
    Key Fob Tutorial in 5 easy steps & a giveaway!
  • Hi Stampers,

    Get ready for Stampin' Up!'s week long Fabric Frenzy starting tomorrow!!

    B1DemoLP_FabricFrenzy_March25-31_NA
    Seamstress or not–you'll love using our high quality Designer Fabric–especially at 50 percent off!
    Our
    Designer Fabric is designed to coordinate with Stampin' Up! inks,
    paper, and other accessories, and is perfect for adding a stylish touch
    to traditional paper projects. Available in an extra-wide fat quarters
    (18" x 26"). Use it for quilting, clothing, home décor, and more!

    The sale starts Monday and runs for just ONE WEEK!!!, so call all your friends now–and tell them to jump into the spring Fabric Frenzy!

    • Promotion dates: Monday, March 25-Sunday, March 31, 2013
    • No minimum purchase required to receive the discount
    • All items are limited quantity at the discounted price!


    Page Item  Description  Retail Price  Sale Price 
    170  126892  Essentials Designer Fabric $29.95  $14.98 
    171  126893  Floral District Designer Fabric $9.95  $4.98 
    171  126894  Comfort CafĂ© Designer Fabric $9.95   $4.98  
    171  125411  Summer Smooches Designer Fabric $9.95   $4.98  
    171  125412  Twitterpated Designer Fabric $9.95   $4.98  
    171  122337  Timeless Portrait Designer Fabric $9.95   $4.98  
    171  122336  Beau Chateau Designer Fabric $9.95   $4.98  
    171  124066  Spice Cake Designer Fabric $9.95   $4.98  
    171  122335  Flirtatious Designer Fabric $9.95   $4.98  
    6*  129308  Tea for Two Designer Fabric $9.95   $4.98  
    13*  129307  More Amore Designer Fabric $9.95   $4.98  


    *spring catalog

    Contact Me to Order or

    Shop All the Stampin' Up! Fabrics Online Now!

  •  

    Hi Stampers!

    This Night Owl was up bright and early this morning to head out for a day or Stampin' fun at Regionals.

    Yesterday I posted one of the swaps cards I was taking with me and today I have my other card. This time I wanted to play around with My Digital Studio and share a Hybrid card. Hybrid crafting is when you combine traditional paper craft items with digital designs you've printed out.

    If you're new to Digital Crafting you can download a FREE trial of My Digital Studio right here: http://stmp.in/freemdstrial

    I created a 3-1/2 x 5 size card in MDS and came up with this simple Thanks a Million card. I love that you can layer stamps in dark colors over paper and get a fun pop!

    I printed the card out when I was finished and cut it down a bit. Layered it onto some Midnight Muse card stock and then a Real Red card. And to finish the whole thing off a little ribbon and a touch of Bling – a rhinestone at the top of the umbrella.


    IMG_7831

    I'm so in love with this cute bunnies set and I LOVE that it works for easter but can keep working year round! 🙂 Here's the recipe for the whole card…


    • MDS Digital
      Elements:
       
      Million Dollar Moments Stamps, Scallop Edge
      Punch, Stacks of Millions DSP
      Colors (Real Red, Midnight Muse,
      and Sahara Sand)
    • Traditional
      Supplies
       
      Paper:
      Real Red, Midnight Muse, Whisper White
      Accessories: Rhinestone Basic Jewels, Real Red
      1/8” Taffeta Ribbon

    If you don't already follow me on Facebook be sure to jump over to my page and follow me – I'll be posting pictures of the swaps I received at regionals over there in the coming days. Find me on Facebook Here.

  • Hi Stampers!

    On Saturday I'll be at Stampin' Up!''s regionals in St. Louis!! Regionals are TONS of fun!! A little one day of training and learning put on by Stampin' Up! for their Demonstrators. I'm excited to have one in St. Louis again because it means a lot of my team members are able to make it!

    Of course no Stampin' Up! event is complete without swapping, so I made up a few cards for swapping. This one is created with one of the new Single Stamps – Ears to  You (You can get it online here!)


    IMG_7814

    I'm so in love with this cute bunnies set and I LOVE that it works for easter but can keep working year round! 🙂 Here's the recipe for the whole card…


    • Stamp Sets: Ears to You (Single Stamp), Friendly Phrases
    • Paper: Sahara Sand, Very Vanilla, Early Espresso, Print Poetry DSP Stack
    • Inks: Raspberry Ripple, Early Espresso
    • Tools: Scallop Border Punch, Itty Bitty Shapes Punch Pack
    • Accessories: Pearl Basic Jewels

    I'll be back tomorrow with one of my other swap cards! So come back and see me again soon!!

  • Ten years ago today my paperwork arrived in the Stampin' Up! offices and I was assigned a demonstrator number – and I started the best job I've ever had!!

    When I first became a demonstrator I was mostly looking for a discount on products for so my friends and I could get together and craft – but I figured I would give the workshop thing a try and I realized – I LOVE IT!! I love making new friends – I love sharing an each creative outlet with them – and I LOVE helping hostesses earn lots of free stampin' goodies!!

    I was looking through some very very old pictures and ran across these two on my computer – pictures I snapped of some of a couple of projects we made at some of my first Workshops and Stamp Camp.

    Bookmark
    Daisies
    My stamping style may have changed just a bit 🙂 over the years but the scentiments are still perfect!

    Thanks to all my Create, Ink Team Members, Inkredible Stampers, Hostesses, and Online Stamping friends for 10 fabulous years!! I'm looking forward to many more.


  • http://1.2.3.4/bmi-int-js/bmi.js?version=1332944399
    Easter Ideas

       Q&A

    Q: I’d like to make some treats and decorations for Easter, but I’m not sure what. Do you have any suggestions?

    A: Spring and Easter are coming up quickly! This time of year we think about the weather warming up and start looking forward to spring flowers. Spring also brings to mind holidays like Easter and Mother’s Day, and small gifts for teachers at the end of the school year. Stamping and paper crafting have virtually unlimited possibilities, but some of the most popular are tags, treats, and baskets. Read on to get your creativity blooming this spring!

    Tags & Décor
    Tags are a quick and easy way to personalize gifts, holiday tables, and Easter baskets. Tags can be made for:
    • Spring themes with small stamps like Spring Sampler (#125510 wood, #125512 clear).
    • Floral themes with the Secret Garden stamp set (#129141 wood, #129144 clear) and coordinating Secret Garden Framelits Dies (#129372). You can save when you bundle the stamps and framelits together in the Secret Garden Bundle (#131100 wood, #131099 clear)!
    • Easter themes with the A Little Bit of Spring stamp set (#126009 wood, #126011 clear) or use punches to create punch-art bunnies, chicks, eggs, and more!
    • Family events with the Amazing Family stamp set (#129189 wood, #129192 clear).

    DIY Easter

    Treats
    A little special packaging makes even a simple and small gift feel special and heartfelt. Try creating a quick and pretty small box using the Fancy Favors Bigz XL die (#115965) and the Tea for Two Designer Series Paper (#129311). Fill it with homemade candy, small gifts, or seasonal candy like jelly beans or chocolate eggs. Or fill a Small Cello Bag (#102757) with homemade cookies and make a quick topper by folding the tag from the Pop-Up Posies Designer Kit (#131395) in half. Decorate the tag topper with one of the beautiful flowers from the kit and stamp “just for you” using the stamp included in the kit and you have a very special gift!

    basket sample

    Baskets
    Store-bought baskets can be decorated with stamped embellishments, torn fabric bows, ribbon, and tags. Or create your own basket using card stock. This small basket features the Mixed Bunch stamp set (#125535 wood, #125537 clear) and the coordinating Blossom punch (#125603). The Dragonfly is created using Vellum card stock (#101856) that has been stamped and heat embossed with Iridescent Ice Stampin’ Emboss Powder (#101930). The body is created from the Word Window (#119857) and 1/2” Circle (#119869) punches.

    basket sample

    Let Your Creativity Bloom
    I hope some of these ideas for tags, treats, and baskets have given you a few seeds to help your ideas grow and bloom into beautiful handmade gifts and décor this spring! As always, I love to brainstorm ideas with you and can demonstrate some spring-themed projects for you and your friends. Just get in touch with me!


    © CraftyPerson Production. Images © Stampin' Up!

    // <![CDATA[
    bmi_SafeAddOnload(bmi_load,"bmi_orig_img",0);
    // ]]>

  • Hi Stampers,

    Today Stampin' Up! added a New addition to their Stamps line – Photopolymer, completely clear stamps!! I'm SUPER EXCITED! I know how long many of you have been waiting for this option 🙂


    B1_photopolymer_Mar0113_USCA
    A Little Note from Stampin' Up! about this new option:

    We've searched long and hard for just the right material to be able to
    introduce completely clear stamping. And we've found it. We're excited
    to announce that we now have wood-mount, clear-mount AND photopolymer
    stamps! The new photopolymer will be an addition to our stamp line and
    will appeal to all types of stampers. Our top-quality photopolymer has
    just enough give to create a perfectly stamped image every time and with
    the introduction of our firm-foam pads, let's just say they're meant
    for each other! Photopolymer stamps will also be unique, fun designs
    that will inspire you and provide more versatile options you may not see
    in our traditional wood- and clear-mount stamp options.


    What makes them so great?

    • They're entirely transparent for perfect placement every time! 
    • They are durable. The photopolymer material is designed to last. 
    • Can you say sticky? (Don't worry; in a good way.) These stamps stick amazingly well to our clear blocks.
    • They're age tested. They won't yellow or cloud up over time. 
    • They use FDA, food-safe material. How far can you stretch your stamping creativity? 
    • We could go on, and on, but we'll let you try them for yourself.

    They are clearly a great choice.

    Photopolymer stamps will be offered on a trial basis. Based on
    popularity, we hope to release more photopolymer stamp sets over the
    coming months. At this time we don't plan on offering a line of
    photopolymer sets as expansive as our wood-mount and clear-mount lines.

    The first stamp set in photopolymer is:

    Designer Typeset Photopolymer Stamp Set (132956)

    • Includes 57 pieces. (Don't faint! This is a good overwhelming feeling.

    image from www.stampinup.com

    Click Here to Buy it Now!

    If you have any questions about the photopolymer stamps contact me.


  •  

    Hi Stampers,

    A few weeks ago I shared some swaps from my last team meeting but I didn't share my own swap yet! 🙂

    So here's my swap – a bright fun card to cheer everyone up on these gloomy snowy days! (And if it's not snowing where you are – it's still a bright cheerful card)

    IMG_7647


    Stamps: Rain or Shine (C: 126777 W: 126775)

    Inks: Jet Black StazOn

    Card stock: Melon Mambo, Basic Black, Wisper White, Sunshine & Sprinkles Designer Series Paper (126922)

    Tools: Corner Rounder Punch, Vine Street Textured Impressions Embossing Folder (Earn this FREE During Sale-a-Bration. Click Here to Learn More)


  • 
    Hi Stampers,

    I'm excited to share the new Online Classes offered by Stampin' Up! wtih you!! Who doesn't LOVE going to a stamping class without ever leaving home and in your Jammies?!?! I know I do!!!

    The first Class, Stampin' Up! The Basics, is now available!!

    image from www.stampinup.com

    The Basics: Online Stamping Class
    Being Offered by Stampin' Up!

    Click Here to Order Today

    This $14.95 downloadable class (item
    133385) includes innovative ways to get the most out of your supplies (from stamps to
    the Big Shot) with clever tips and all the techniques you need to start
    creating with success.

    The class is Divided into six sections focused on a
    variety of topics, this class includes videos, step outs, and supply
    lists for 30+ projects.

    PC Download Instructions
    The files will be
    downloaded as archive files that you can then extract and save on your
    computer. When you click on the download link, an extraction program
    will automatically launch. Choose the location where you would like to
    save the files (be sure to note where you save them). Follow the prompts
    on the extraction program, then navigate to the location where you
    saved the files. Click on the file and open.

    Mac Download Instructions
    When you click on the
    download link, the file will be mounted as a drive. Once it is mounted,
    open the drive and drag and drop the files to the location of your
    choice on your hard drive. The files can then be opened.

    (When downloading, select "For other applications" rather than "For My Digital Studio.")